How to Write a Usability Testing Report (With Free Templates and Examples)
Updated by Xtensio
A Usability Testing Report is a key document that allows you to gain insight into your users’ expectations and frustrations, and it is crucial in evaluating your product’s success – whether it’s a physical product, a mobile app, or a website. Our comprehensive step-by-step guide will help you summarize, analyze, share, and understand your user testing results. Follow along with our Free Usability Report Template.
Listen to this article:
Xtensio is your team space for beautiful living documents.
Create, manage and share business collateral, easily.
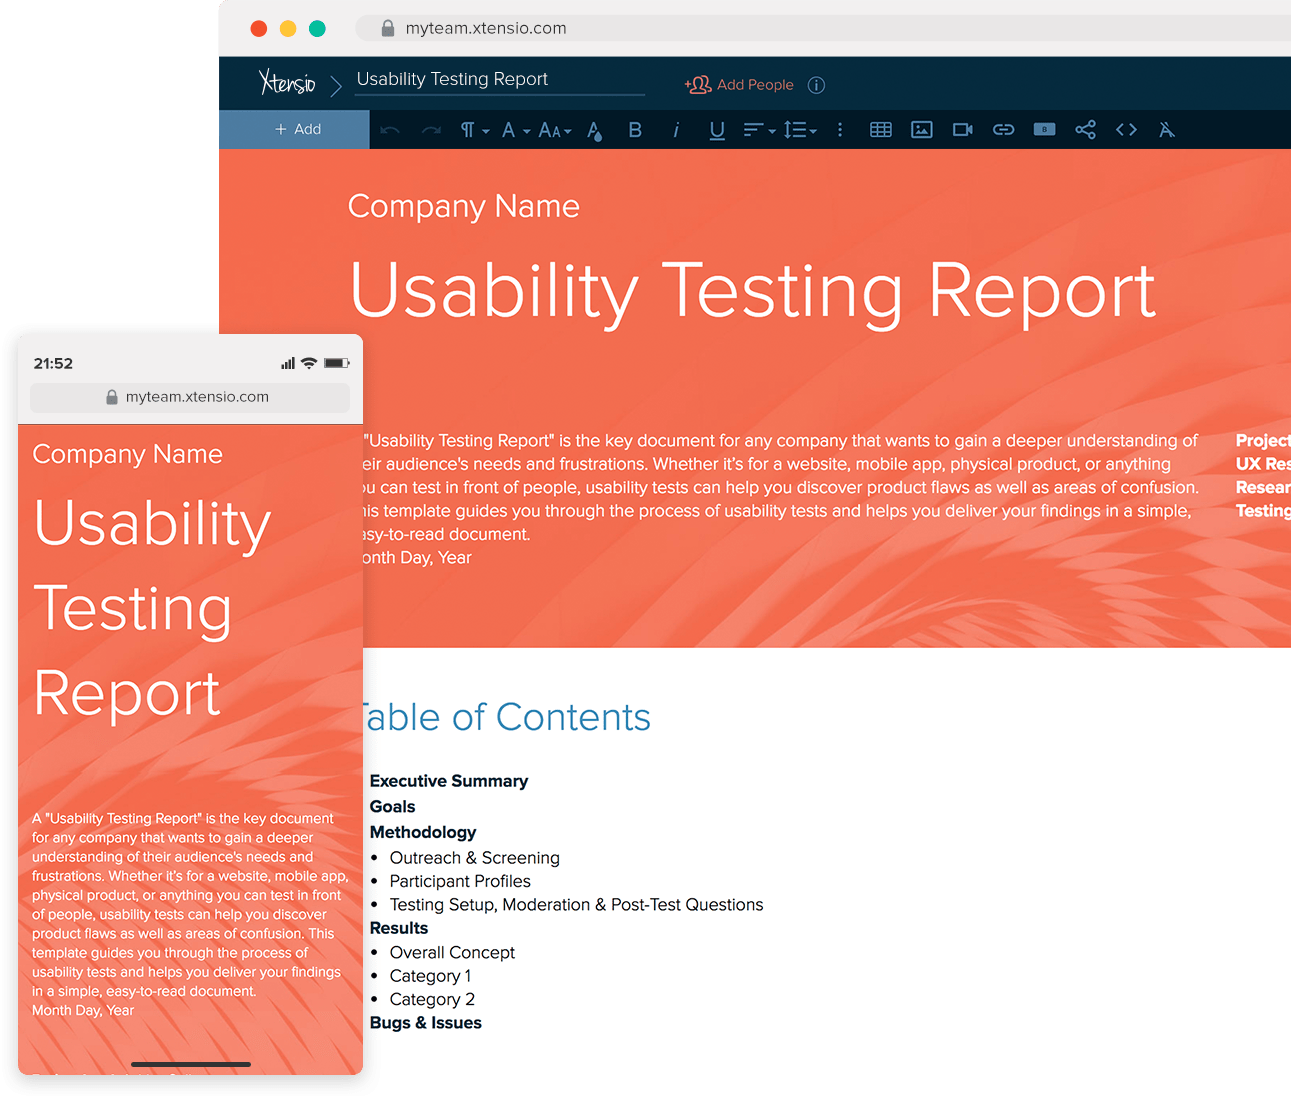
Table of Contents
A step-by-step guide to writing a successful UX report

If you are testing what users like or dislike about your product and finding solutions for their issues, you will need to create a user (or usability) testing report that leads to a deeper understanding. Make sure your report uncovers the information you need to improve your product. Here’s how you can do it effectively:
Quick Tip: Use Xtensio to create a living document that you can collaborate with your team on and simplify your process. When you’re finished, it can easily be shared as a live link with your product and management teams to guide the next steps.
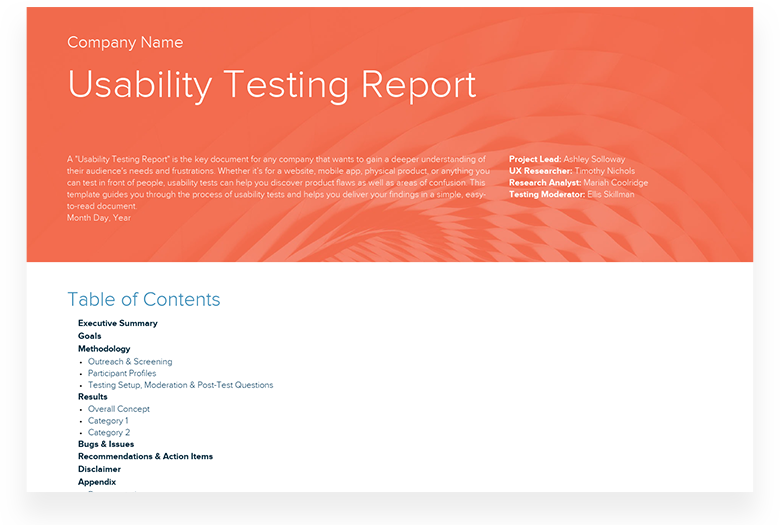
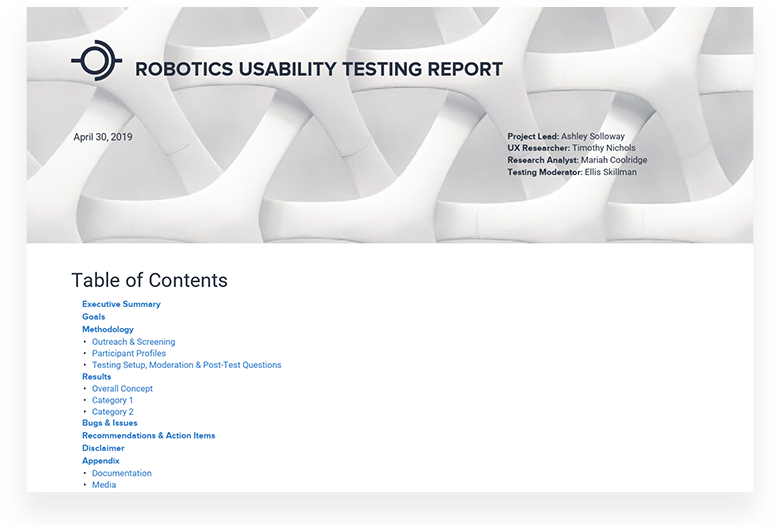
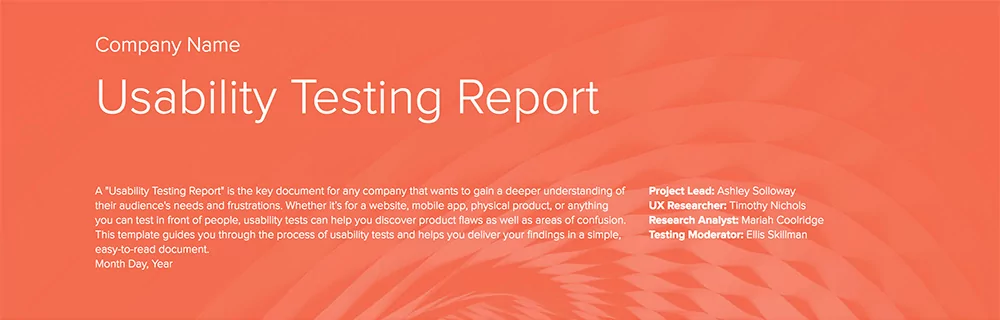
1. Company name and logo
Start your report by highlighting your company:
- Company name
- Company logo
- UX Researchers involved in conducting the report (Who was the project lead? Who managed the UX Research process?)
- A background image that showcases the product or feature tested
- Date the report was created
2. Table of Contents
UX reports are generally long and hyper-detailed. Include a Table of Contents to help anyone reading your report find what they’re looking for, easily. List segments of your report and link to the corresponding sections. The overall structure of your report should include:
- An executive summary
- Goals
- Methodology
- Results
- Bugs or issues
- Recommendations and action items
- Disclaimer
- Appendix
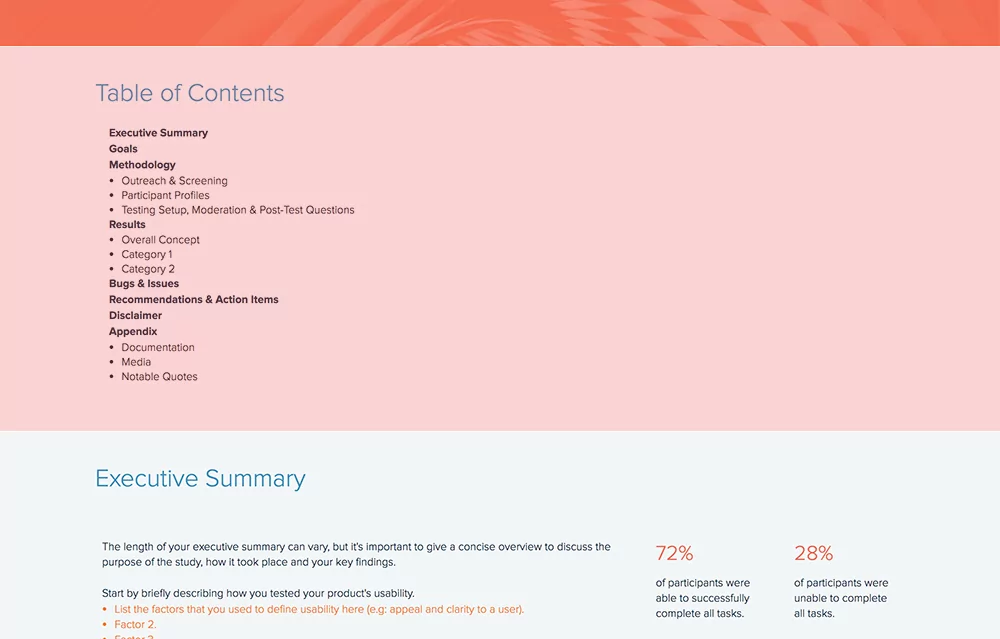
3. Executive Summary
The executive summary should give a concise overview of the report, discussing your key findings, the purpose of the study, and how and where it took place. Start by mentioning how you tested the product, the methods you used, and the details on the age range and geographic breakdown of your testing group. Use statistics to highlight the main factors of the study.
- How many participants completed the tasks successfully?
- How many of them were not able to complete the task?
- How many participants enjoyed the study?
- Were there any participants who complained about their experience?
- Did any participants mention that they would continue using the product/service?
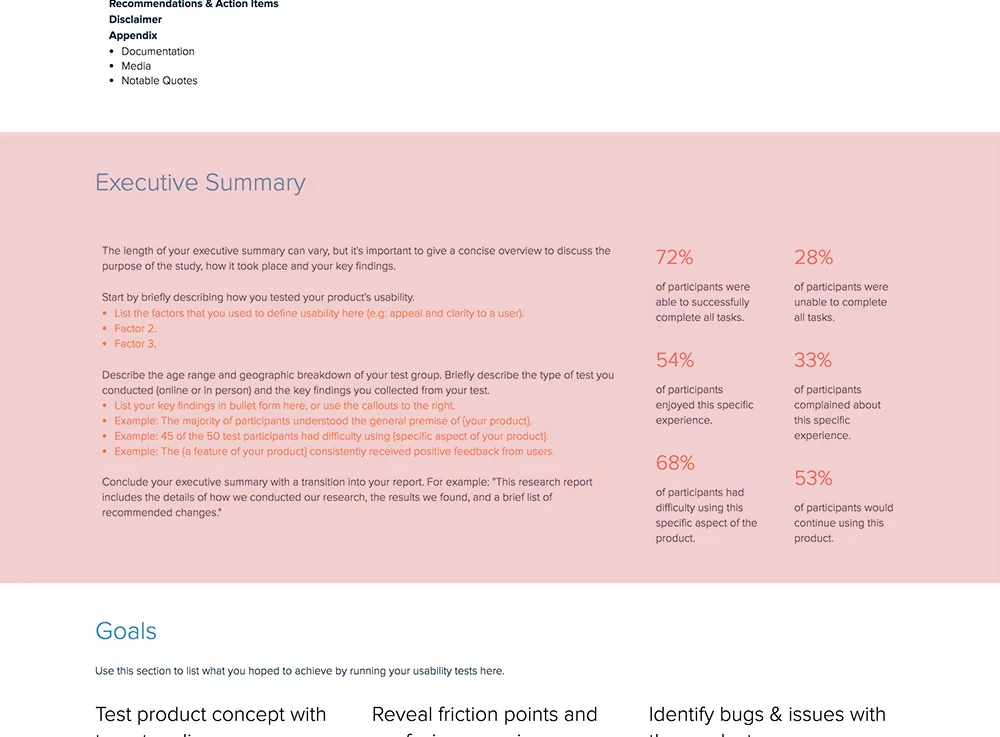
4. Goals
Your report will be created with specific goals or objectives in mind. Your goals should be explained thoroughly so your team can go back after conducting testing and understand what aspects of the product work and what needs improvement. Indicate the main objectives you wanted to accomplish while conducting user testing.
- Do you want to test a specific product concept with a defined audience?
- Are you testing a completely new product with an audience well-versed in similar products?
- Are you trying to uncover roadblocks in the user’s experience with your product?
- Is your goal to find possible bugs or issues?
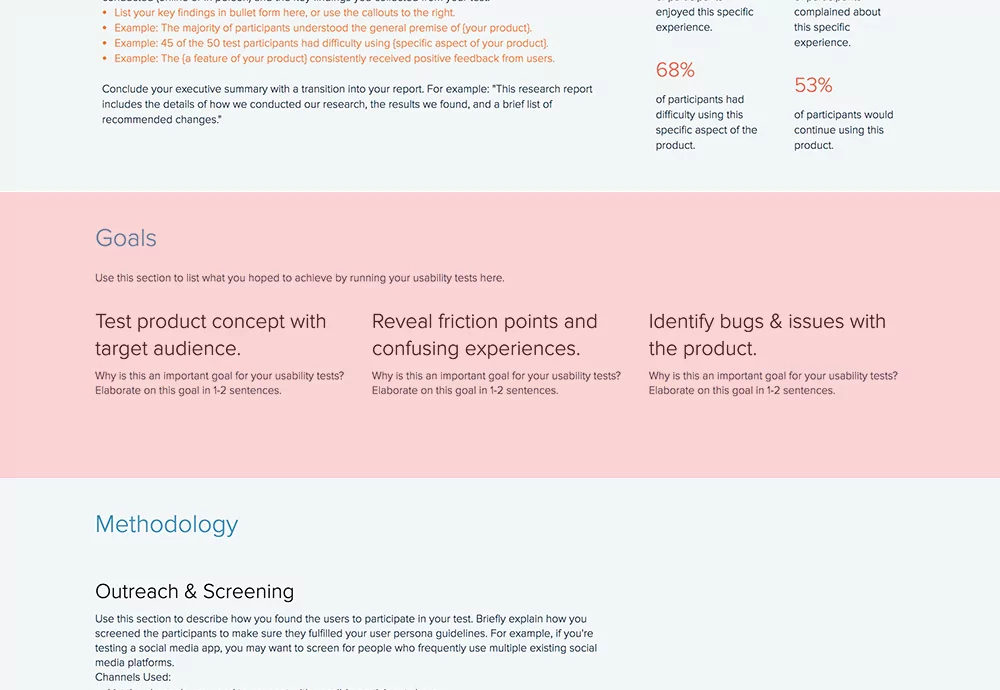
5. Methodology
So you want to test a female-focused pilates app on your target audience – professional women between the ages of 25 and 40. For testing, you decided to go to several cafés on week days between 3 and 5 pm. You asked women to try your app and, after gathering the research, you realized that your test group was mostly students or retired women. With this methodology, you likely put in a lot of effort and ended up with a whole chunk of unnecessary data.
If you want a successful usability report to help optimize your product and reach your users’ needs, your methodology should be on-point. Explain how and where you found the participants for your usability testing. Mention your screening criteria, the channels you used, and simply the methodology you followed. Was it an online approach or in-person? Give details.
As UX Matters research notes in the Do’s and Don’ts of Usability Testing, “Recruiting is often the most critical element of usability testing. If you conduct usability testing with the wrong participants—people who aren’t representative of your target market—you’ll often find yourself making the wrong changes to a product’s user interface.”
Bonus: Don’t forget to analyze the effectiveness of your methodology afterward to improve your process for future usability testing research. By creating your usability report on Xtensio, you can copy or move entire sections from one folio to another to speed up the creation of your next report.
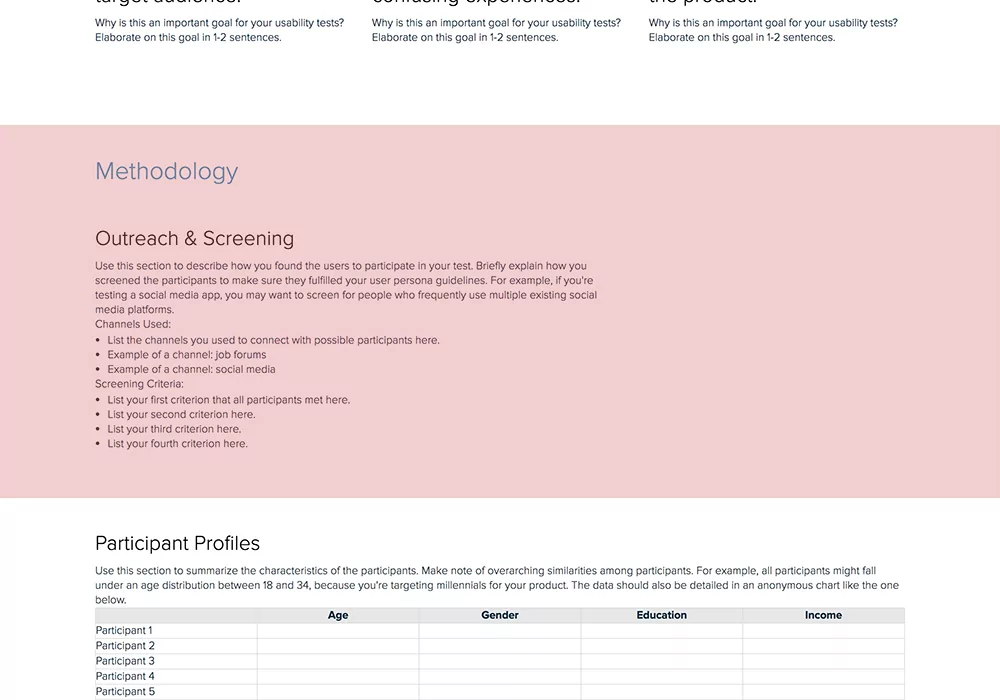
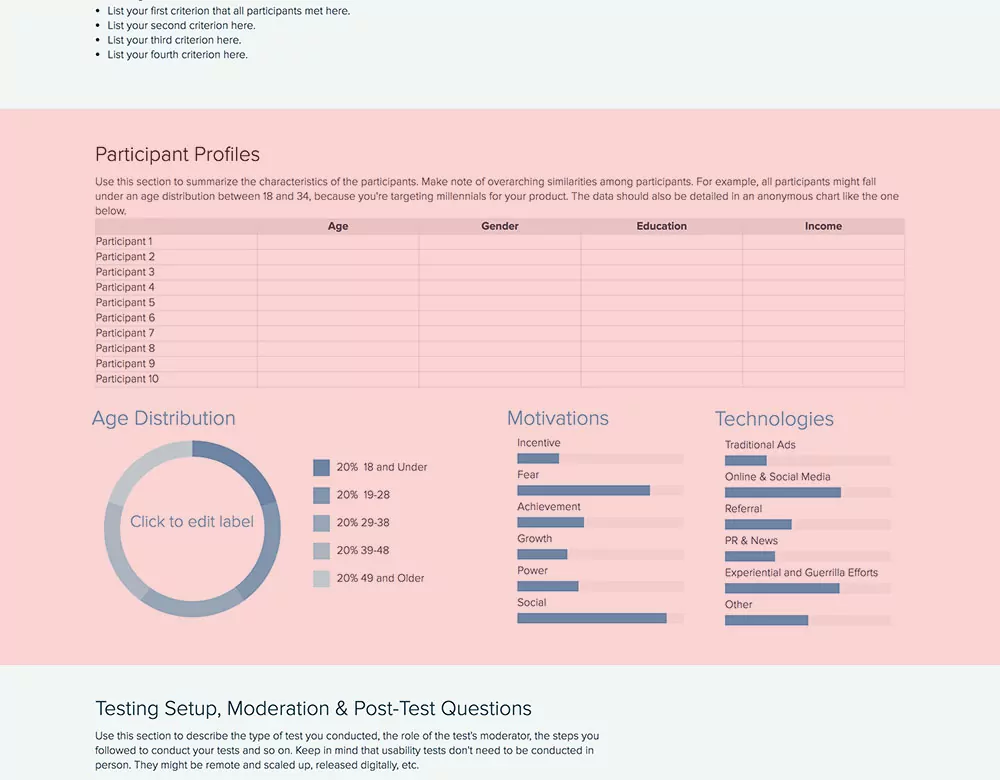
6. Participant Profiles
After outlining your methodology, describe who your participants were. Identify and mention similarities among participants, if there are any. For example, you might be targeting kids between 8 and 12 for your new robotics project and all participants might be under this age group.
- How many participants did you have?
- What was their age/gender/income/education level? (or any other related information that needs to be known)
- What was the overall age distribution?
- What were these participants motivated by (i.e. what would make them purchase a product)?
- What technologies were used to reach these participants? Did you take advantage of social media or only rely on traditional ads?
Bonus: Participant profiles should be detailed with all information crucial to understanding how this participant fits in with the overall goals of the usability testing research. Make sure your data is correct and the numbers are exact. Take advantage of Xtensio’s charts and graph modules to visually showcase your data.
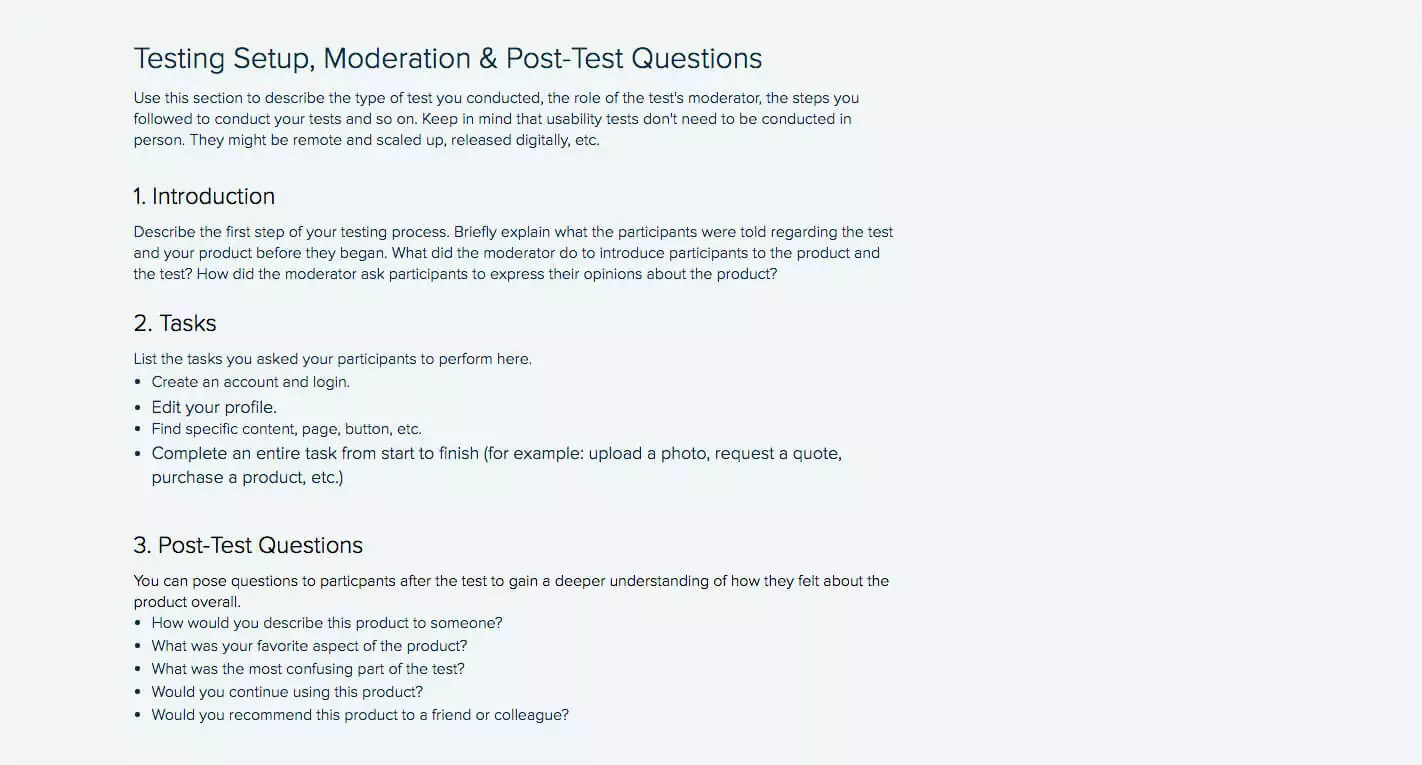
7. Testing Setup, Moderation & Post-Test Questions
Here, you want to explain how you set the testing up, the moderator’s role in the testing (if it wasn’t remote), and any post-test questions that were addressed to the participants.
Introduction: How did the test start? What was the first step that needed to be completed by the users? What did the moderator tell users to do? Give a brief explanation of the introductory elements during testing.
Tasks: How many tasks did users have to finalize and what were these tasks? For example, in order to test your new app, did they need to create an account, log in, and click on certain buttons? List all of the steps you asked your users to follow.
Post-test questions
If you want to gain a deeper understanding of how users are feeling about the product, you can ask them some questions after the test is concluded. You might want to learn what their favorite aspect of the product was, if they would continue using it, or if they would be likely to recommend it to a colleague or client.
Here are a few questions you can ask:
- What was your overall impression of the product?
- This question helps gauge the general sentiment towards the product.
- What did you find most frustrating or challenging while using the product?
- Identifies specific pain points and areas for improvement.
- Were there any features you found particularly useful or enjoyable?
- Highlights strengths and successful aspects of the product.
- Did you encounter any bugs or technical issues? If so, please describe them.
- Helps document any technical problems that need addressing.
- How intuitive did you find the navigation and interface?
- Assesses the usability and ease of navigation.
- Do you have any suggestions for improving the product?
- Encourages participants to provide constructive feedback and ideas for enhancements.
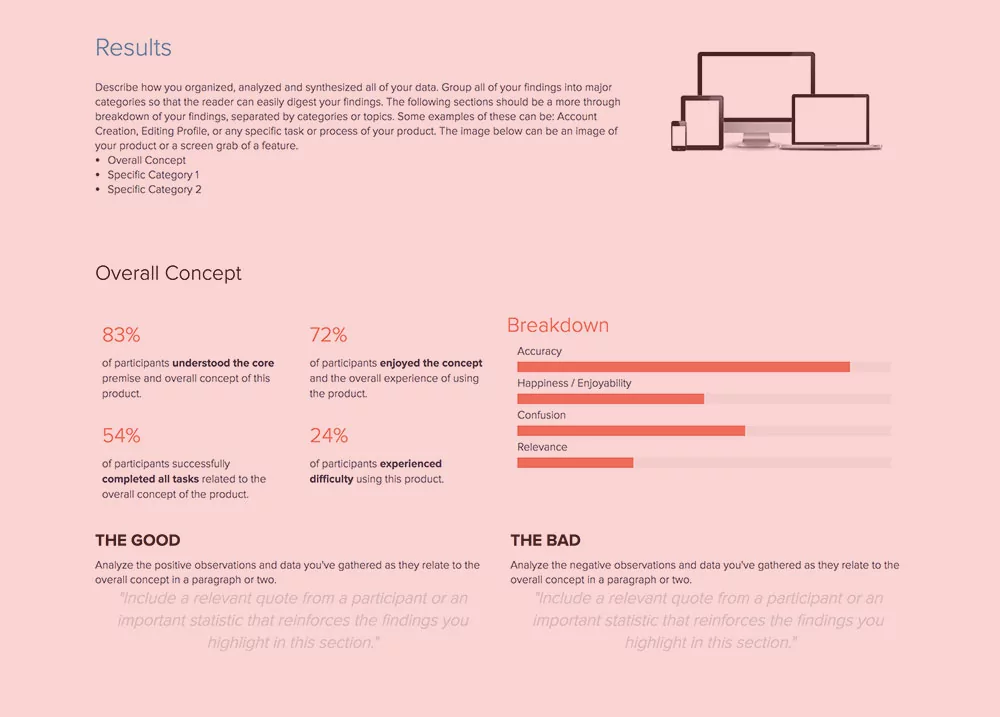
8. Results
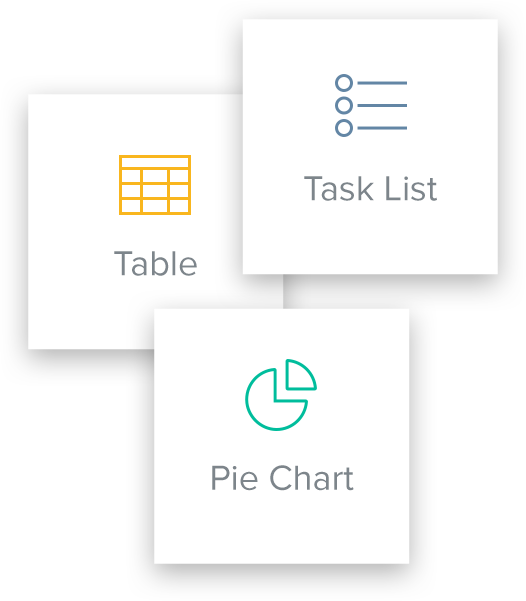
Let readers know how you organized, analyzed, and synthesized all data collected during your usability testing research. Creating different categories to group your findings in will make it easier to understand how you came up with certain numbers and conclusions. First, indicate the overall concept and give a general overview of the results. Then show the details of each category. Use charts to highlight distinctions among result categories. Learnings from the Usability Testing Report will inform other UX design and product management processes such as Customer Journey Mapping and Empathy Mapping.
Quick Tip: At the bottom of each category, state “the Good” and “the Bad.” Remain objective and show both the positive and the negative side of the testing participants’ experience with your product.
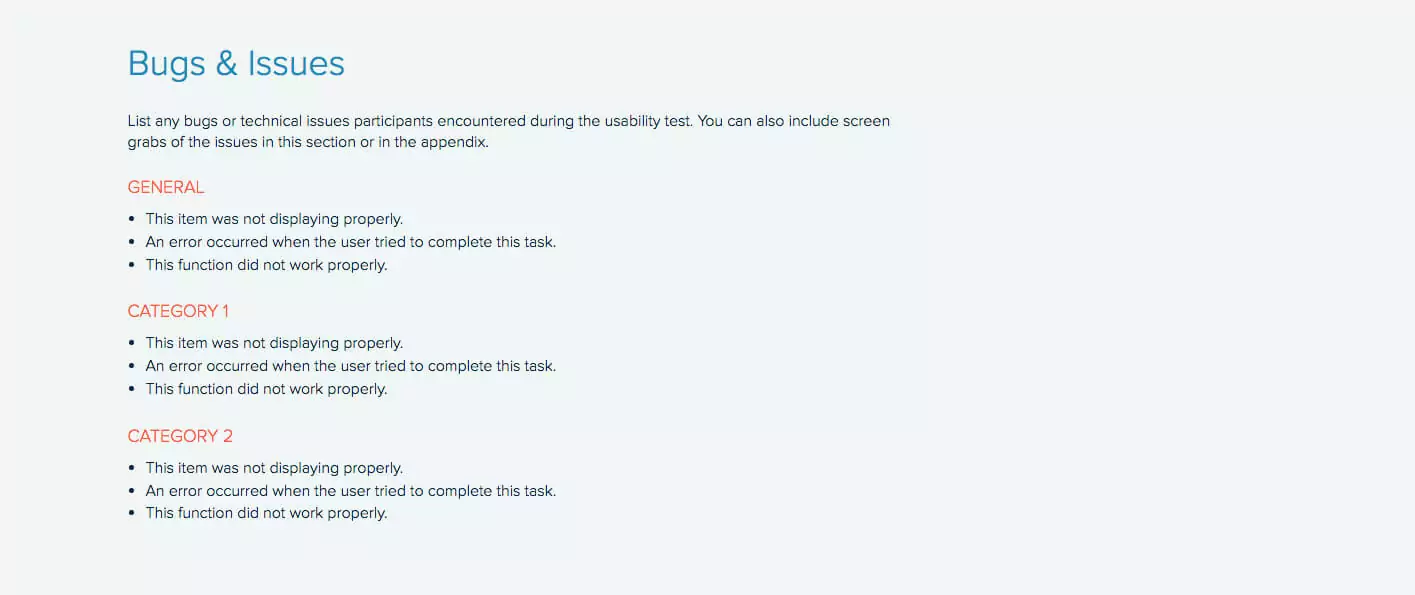
9. Bugs & Issues
Did you see any bugs or issues during the testing process that need to be fixed? List any and all bugs or issues you found. Give an overview of the bugs or issues and divide them into categories for deeper understanding. You can also include images or videos of the issues to give your development team more reference. You can pair this section with a quick Kanban Board and start generating immediate to-do’s. Alternatively, use the Eisenhower Matrix to address the issues with maximum efficiency.
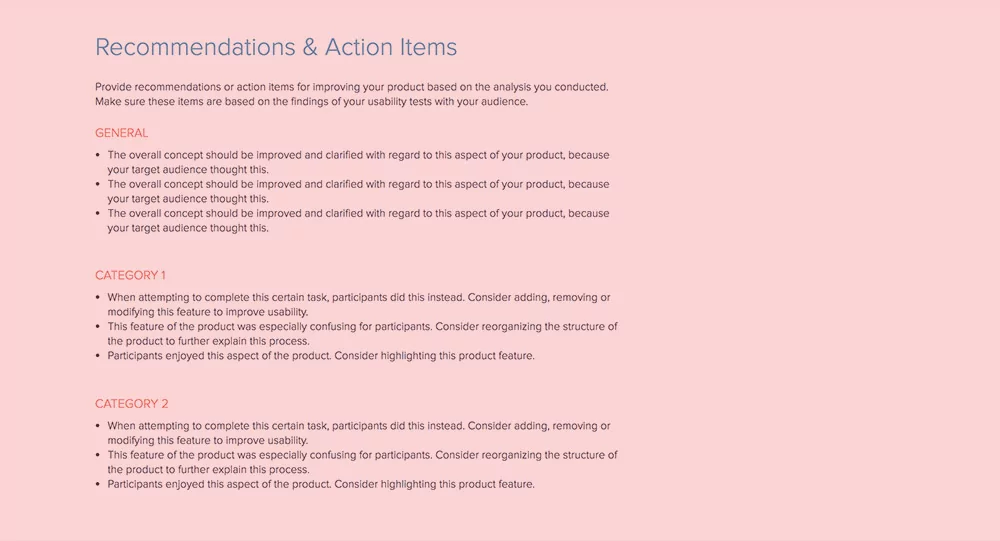
10. Recommendations & Action Items
After analyzing your usability testing research, put together a list of recommendations and action items. What actions should your team take to solve a certain issue? How can you improve your product? These items should be consistent with the feedback you’ve gathered from the users during testing. Again, take categories into account, but don’t forget to give a general overview.
- General: Do you need to improve the overall concept of your product? If yes, how? Are there any features that could be optimized to reduce roadblocks in the user’s journey? What did the users recommend and what is the best solution?
- Categories: What did Category A vs. Category B think about the product? Were there any roadblocks? Did they accomplish certain tasks differently? Give details.
Take these recommendations and move them easily to your Product Roadmap, Marketing Plan, or Content Strategy Planner. How to do this on Xtensio? Click the section menu. Select Copy to Project. See this section of your document copied in another.
11. Disclaimer
There might be different factors that affected the results of the usability testing. It’s important to identify these factors and list them in your report. Did all participants follow the set agenda? Were there any human errors and misinterpretations of qualitative feedback that affected the results?
Users’ biases and personal experiences might have an impact on the results, so make sure to note some of the factors you came across thoroughly.
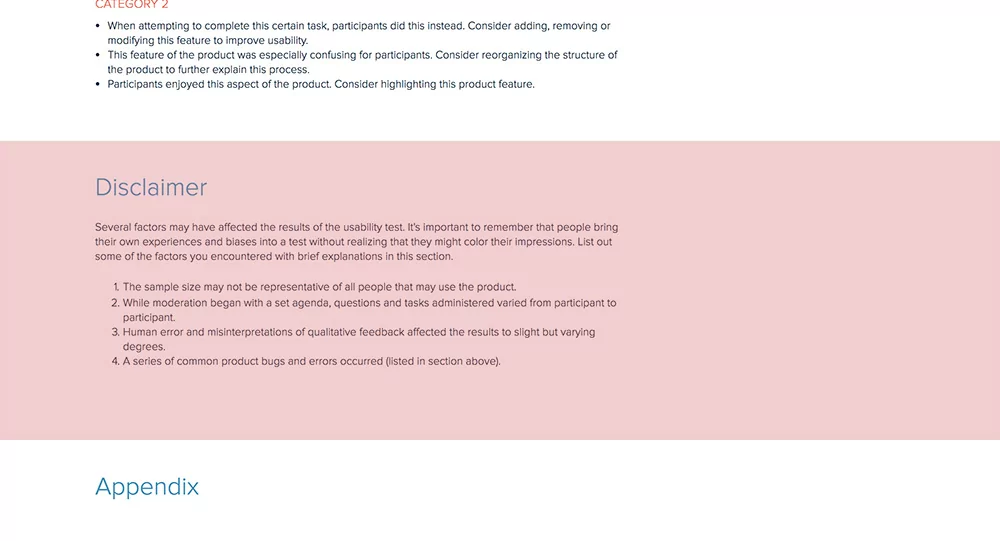
12. Appendix
You should include related links to notes, documents, data, media resources, or notable quotes in your appendix. This will show professionalism and accuracy, and it will make it easier for your team to reach the resources they want to dig deeper into after reading your usability testing report.
- Documentation: List all links to documentation related to the usability testing. This can include research materials such as raw data, survey links, or responses.
- Media: Don’t forget to include screen grabs, especially if you reported any bugs.
- Quotes: Mention any notable participant quotes, whether it was mentioned during or after the test. It’s important to include quotes that give good insight into the product and your future roadmap.
Quick Tip: Conclude your usability testing report with a “thank you” note, add your logo and even a background image (i.e. the image of the tested product) to the footer.

Easily update your usability testing report
The user testing report template is adaptable just like other Xtensio tools. It can and should be repurposed, revisited, and revised to suit your evolving needs. You can duplicate your folio to easily get started on the next one or save it as a template. And remember, all of our templates are meant to be starting points. You can always add, delete, and move your modules and sections around with Xtensio’s versatile editor to adapt the template to your user experience testing goals.
Usability Report vs UX Audit vs Heuristic Evaluation
UX teams use several different assessment methods, and the deliverable for each one looks different. Choosing the wrong format wastes research time and confuses stakeholders. Here is how the three most common approaches compare.
A usability testing report documents findings from actual user sessions. Real participants attempt real tasks while a researcher observes. The report captures what happened: task completion rates, error counts, time on task, and direct user quotes. It answers the question “Can users accomplish what they need to?” The strength of a usability report is its empirical evidence. Every finding is backed by observable behavior, not opinion.
A UX audit is a comprehensive review of an existing product or interface conducted by a UX professional or team. It combines heuristic analysis, analytics data, accessibility checks, and competitive benchmarking into a single document. Unlike a usability report, a UX audit does not require recruiting participants. It answers the question “Where does this product fall short of best practices?” UX audits are broader in scope but rely on expert judgment rather than user data.
A heuristic evaluation is the most focused of the three. One or more usability experts review an interface against a set of established principles (Nielsen’s 10 heuristics are the most common). The evaluator walks through the interface, flags violations, and rates their severity. It answers the question “Which usability principles does this interface violate?” Heuristic evaluations are fast and inexpensive because they do not require users, but they can miss problems that only surface during real-world use.
When to use each:
- Usability report: After running moderated or unmoderated user tests, when you need empirical evidence to justify design changes.
- UX audit: When redesigning an existing product and you need a baseline assessment across multiple dimensions before testing begins.
- Heuristic evaluation: Early in the design process or when budget does not allow for user recruitment, as a quick check against known usability principles.
Many teams produce all three at different stages of a project and organize them in a shared workspace so designers, product managers, and engineers can reference them throughout the development cycle.
5 Usability Report Mistakes That Waste Research
Running usability tests is expensive and time-consuming. A poorly written report means that investment does not translate into product improvements. Here are the five mistakes that cause usability findings to sit unread in a shared drive.
1. Listing findings without severity ratings. A flat list of 40 usability issues gives stakeholders no way to prioritize. Every finding should include a severity rating (critical, major, minor, cosmetic) based on its impact on task completion and the number of participants affected. Without severity, engineering teams treat every issue as equal, which means the critical ones get buried behind cosmetic fixes.
2. No video clips or screenshots. Text descriptions of usability problems are easy to dismiss. A 15-second video clip of a user struggling with a dropdown menu is not. Include timestamped video clips or annotated screenshots for every major finding. When stakeholders can see the user’s frustration directly, they move faster on fixes. Share these as live links so the team can view them without downloading large video files.
3. Burying recommendations. If a stakeholder has to read 20 pages before reaching the recommendations section, most of them will not get there. Put your top three recommendations in the executive summary on page one. Detail the full list later in the report, but make sure the most impactful changes are visible within 30 seconds of opening the document.
4. Testing the wrong tasks. If the tasks in your usability test do not match the workflows your users actually perform, the findings are irrelevant. Before writing your test script, review analytics data to identify the top five user flows by frequency. Test those flows, not hypothetical scenarios. A usability report based on tasks nobody performs in production generates findings nobody acts on.
5. No follow-up tracking. A usability report without a tracking mechanism for whether recommendations were implemented is just a document that collects dust. Include an action items section with owners, due dates, and status columns. Review it in sprint planning or design review meetings. Use engagement analytics to see whether the engineering and product teams actually opened and reviewed the report.
How to Present Usability Findings to Stakeholders
Writing a thorough report is only useful if decision-makers absorb the findings. Most usability reports fail not because the research was bad, but because the presentation did not match how stakeholders consume information. Here is how to present findings so they lead to action.
Lead with the executive summary. Executives and product leaders rarely read full reports. Write a one-page executive summary that answers three questions: What did we test? What did we find? What should we do about it? Keep it to five or six sentences. Include the most critical finding, the number of participants, and your top recommendation. This single page drives more decisions than the other 20 pages combined.
Use severity-based prioritization. Group findings by severity, not by task or screen. Stakeholders want to know “What is breaking?” before “What is annoying?” Present critical issues first (tasks users could not complete), then major issues (tasks completed with significant difficulty), then minor issues (friction that slows users down but does not block them). This ordering helps engineering teams plan sprints around the highest-impact fixes.
Show video highlights. Compile a three-to-five minute highlight reel of the most impactful moments from testing sessions. Include moments where users expressed confusion, attempted workarounds, or abandoned tasks. Play this reel at the start of your presentation before diving into data. Video evidence creates empathy that charts and bullet points cannot. Even skeptical stakeholders change their minds after watching real users struggle.
Link findings to business metrics. Usability problems have business consequences. A checkout flow with a 35% drop-off rate is not just a UX problem: it is lost revenue. Whenever possible, connect usability findings to metrics that stakeholders already track: conversion rates, support ticket volumes, task completion rates, or customer satisfaction scores. This translation from UX language to business language is what gets usability fixes prioritized over feature requests.
Share the report as a living document. A PDF attached to an email gets opened once and forgotten. Share your usability report as a living document that you can update as the team addresses findings. Strike through completed recommendations, add notes about implementation decisions, and link to design iterations. When the report stays current, it becomes a reference point throughout the development cycle rather than a one-time read.
Written by


Create and deliver beautiful work, professionally.
Build, brand, and deliver living documents your clients actually engage with.


Join 394,311 professionals delivering work with Xtensio.
Related reports: Annual Report Template, Monthly Performance Report Template